Guide · Admins & Parents Rolling out on NTT Data (NDPS)

UPI AutoPay Setup Guide
For School Admins and Parents

To set up UPI AutoPay for school fees in EduGradUP: the school admin opens Menu → Fee Setup → Fee AutoPay → ⚙ AutoPay Settings, chooses how parents pay (normal payment only, parent's choice or AutoPay required), sets the limit rule and debit date, and saves. A parent then opens Fees in the EduGradUP app, ticks the months, taps Pay Total, chooses “Pay now + turn on AutoPay”, enters their UPI id, pays today's amount and approves the AutoPay request in their UPI app. From the next month, each month's actual fee is debited automatically with a notice 3 days before. UPI AutoPay is rolling out school by school to schools that collect fees online through NTT Data (NDPS).

Last updated: September 2026

Before You Start

CheckWhoWhy
NTT Data (NDPS) gateway enabled for the schoolEduGradUP supportAutoPay runs on the school's own NTT Data merchant account — money settles to the school's bank.
UPI AutoPay switched on for that accountThe school's NTT Data teamRecurring mandates are a separate NTT Data product. Support coordinates it with them.
Parents on the latest EduGradUP appPlay Store / App StoreThe AutoPay card and the “Pay now + AutoPay” choice are in the latest version.

UPI AutoPay is rolling out school by school to schools that collect fees online through NTT Data (NDPS). Until the gateway is ready your settings are saved, but parents see normal payment only.

For the School Admin: Turn AutoPay On

  1. Open the menu ☰ → Fee Setup, scroll to the tiles and tap Fee AutoPay.
  2. Tap the ⚙ settings icon at the top right (or the “School rule” card).
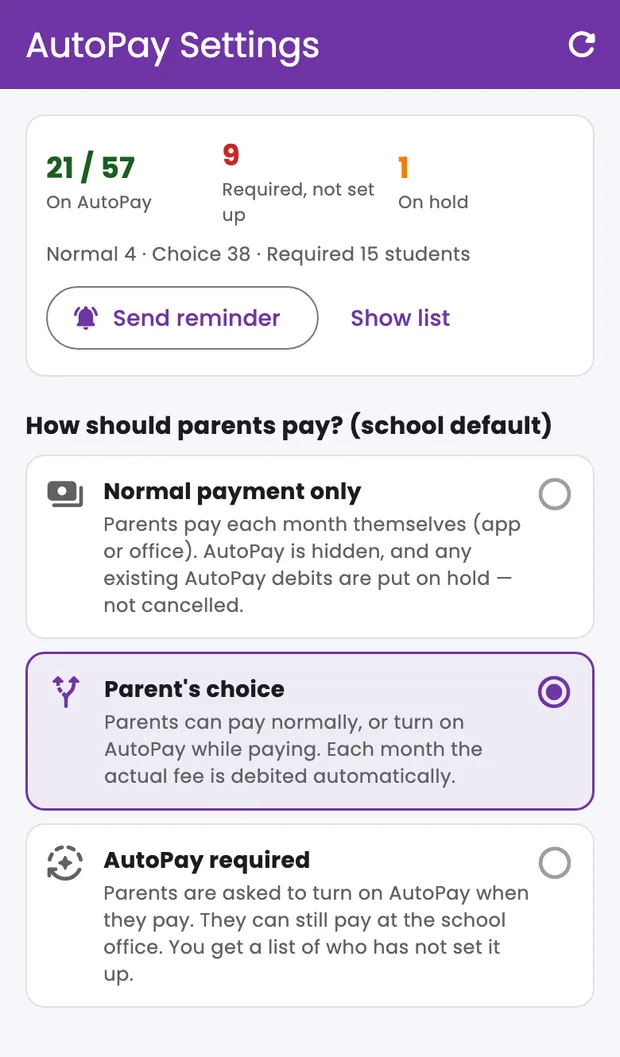
  3. Read the coverage card: students on AutoPay, required-but-not-set-up, on hold.
  4. Choose how parents pay — the school default.
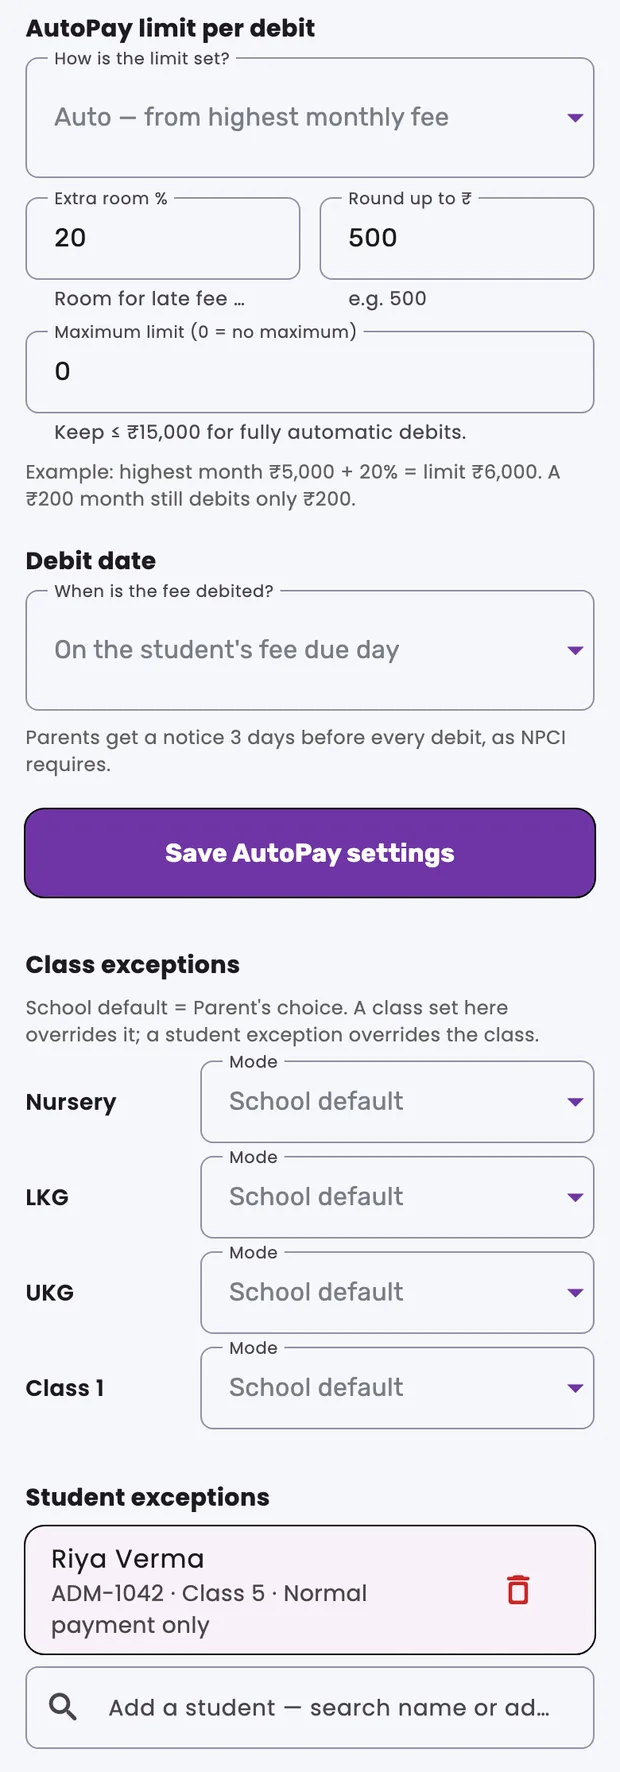
  5. Set the AutoPay limit rule and the debit date rule.
  6. Tap Save AutoPay settings. Switching to Normal payment asks you to confirm first.
AutoPay Settings — coverage card and the three payment modes
AutoPay Settings — coverage and the school default

Choose How Parents Pay

ModeWhat parents seeExisting AutoPay
Normal payment onlyNo AutoPay; Pay Total goes straight to checkoutOn hold — nothing debited, mandate kept
Parent's choice (default)“Pay now + turn on AutoPay” or “Pay now only”Debited normally
AutoPay requiredOnly “Pay now + turn on AutoPay”, plus a red “Set up” cardDebited normally

“Required” never blocks a payment: the office counter stays open, and if the AutoPay request cannot be created the app offers “Continue without AutoPay”.

Set the Limit and the Debit Date

Student's upcoming feesRuleLimit
Oct ₹5,000 · Nov ₹5,000 · Dec ₹5,000 · Jan ₹200₹5,000 + 20%, rounded up to ₹500₹6,000
Every month ₹1,800₹1,800 + 20% = ₹2,160, rounded up₹2,500
No fees billed yetBiggest month of the last year; else the fixed limite.g. ₹15,000
AutoPay Settings — limit, debit date and class exceptions
Limit, debit date and class exceptions

Class and Student Exceptions

Coverage, Reminders and Day-to-Day Actions

ActionWhat it does
Send reminderPush notification to every family that is required but not set up (at most once a day)
Pause / ResumeStops or restarts one family's debits — the mandate stays alive
Raise limitAsks the parent to approve a higher limit in their UPI app
Collect duesSchedules the earliest allowed debit (3-day notice) for what is due now
Check approvalAsks the bank whether the parent has approved (also automatic every 30 minutes)
RetryRe-tries a failed debit (max 4 retries a month)
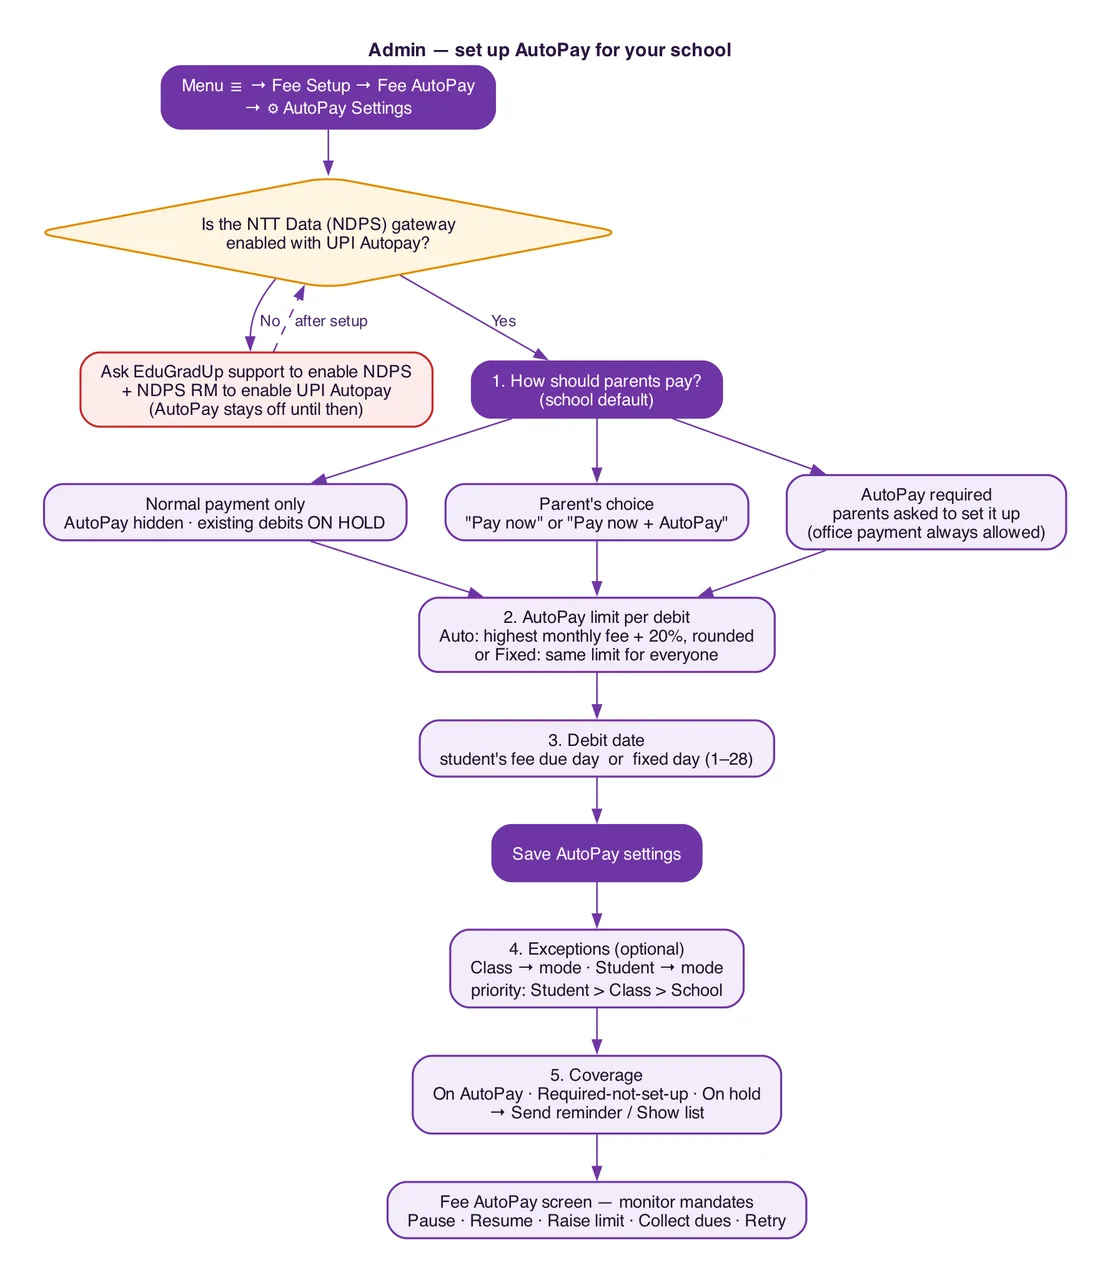
Flowchart: how a school admin sets up UPI AutoPay in EduGradUP

For Parents: Pay Today and Turn On AutoPay

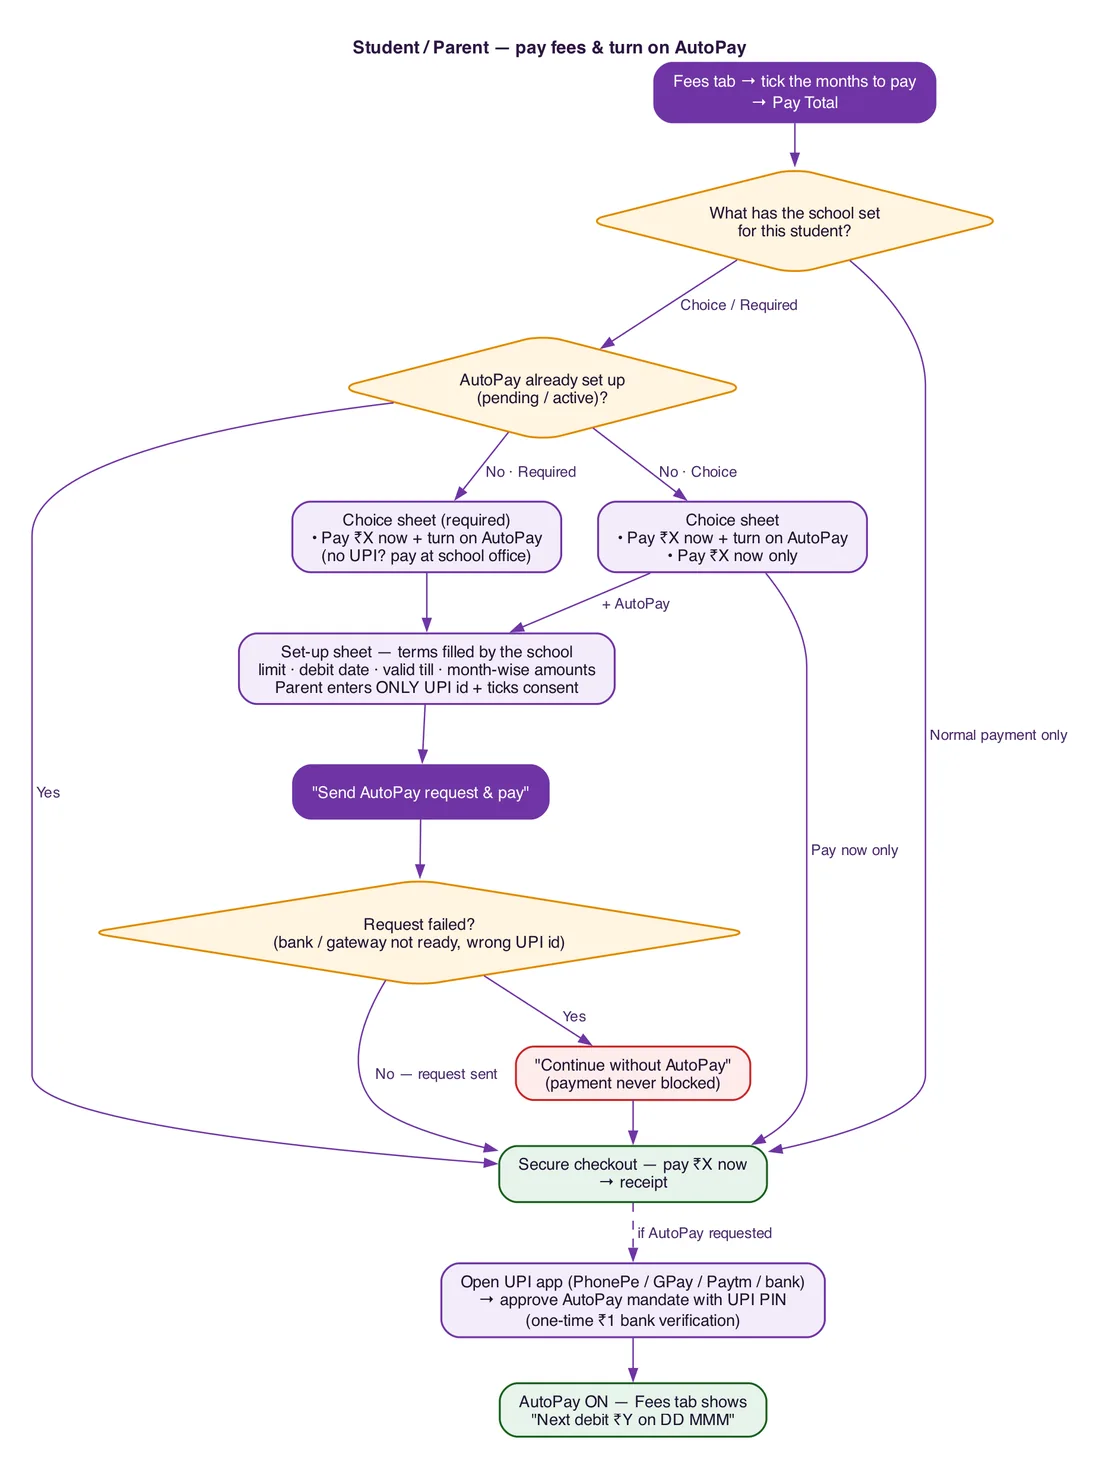
  1. Open the EduGradUP app → Fees.
  2. Tick the month(s) to pay and tap Pay Total.
  3. Choose “Pay ₹X now + turn on AutoPay”.
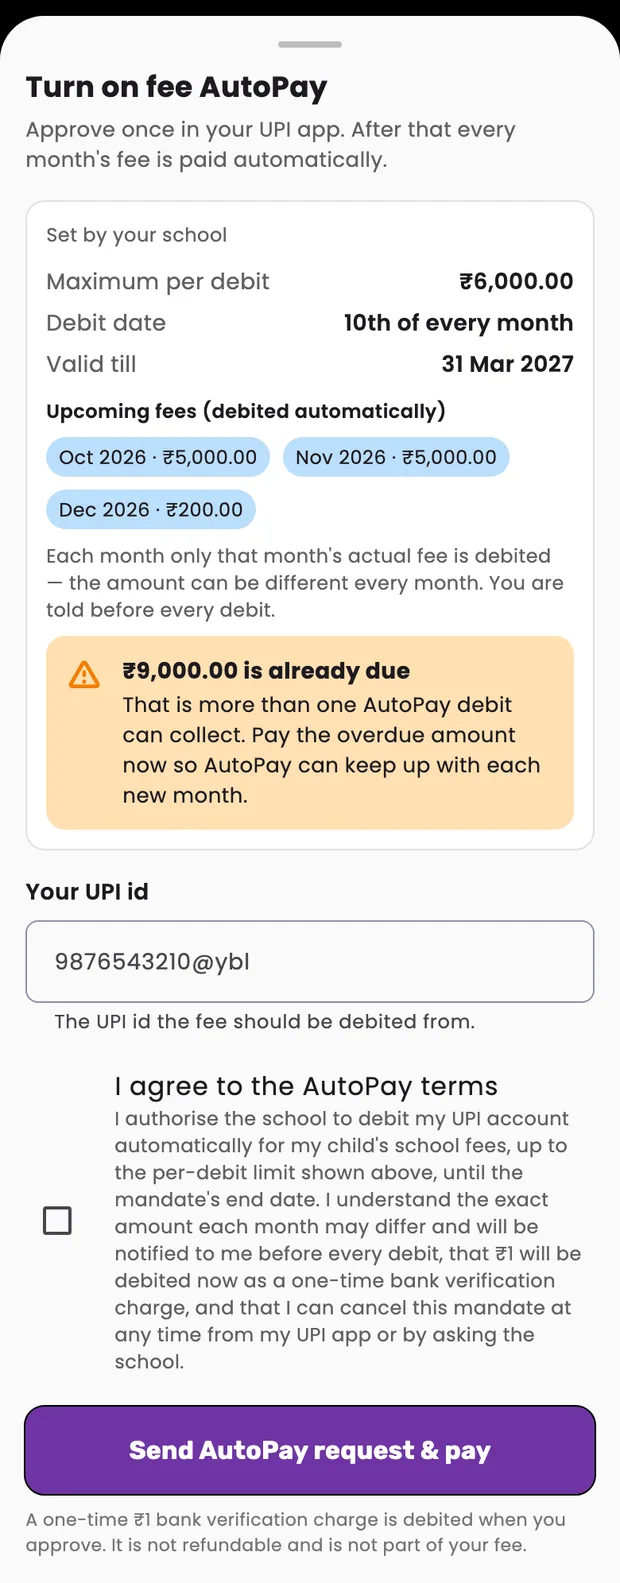
  4. Check the terms set by the school — limit, debit date, valid till and the month-wise amounts.
  5. Enter your UPI id (e.g. 9876543210@ybl) and tick “I agree to the AutoPay terms”.
  6. Tap Send AutoPay request & pay and pay today's amount on the secure payment page.
  7. Open your UPI app and approve the AutoPay request with your UPI PIN within 48 hours.
  8. Back in the app, the card changes to “AutoPay is on” with the next debit amount and date.
EduGradUP app — AutoPay set-up sheet with terms filled in by the school
Only the UPI id is typed — the school's rules fill in the rest
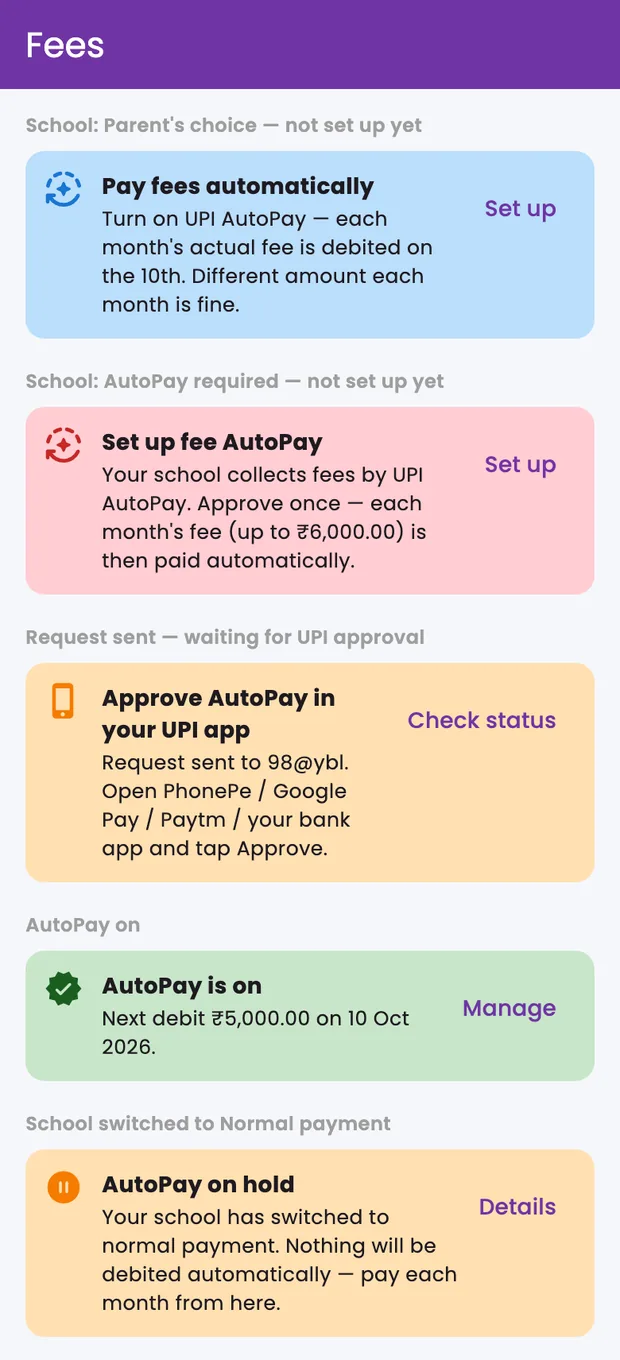
EduGradUP app — the five states of the AutoPay card on the Fees tab
The AutoPay card on the Fees tab

What Happens Every Month

Flowchart: how a parent pays school fees and turns on UPI AutoPay in EduGradUP

Troubleshooting

What you seeWhat to do
“AutoPay is not available yet”The school's NTT Data AutoPay is not switched on yet — ask the school / EduGradUP support.
“Your school uses normal payment”This student is on Normal payment only — pay from the Fees tab.
“Approve AutoPay in your UPI app” staysApprove it in the UPI app, then tap Check status. After 48 hours set up again.
“₹X is already due” on the set-up screenOverdue fees are more than one debit can collect — pay the overdue months now.
“AutoPay stopped”The first debit could not be collected — pay the month and set AutoPay up again.
“Continue without AutoPay”The AutoPay request could not be created now — pay normally and try later.

Download the Guide

The same guide as a 15-page PDF, plus the three flowcharts — to print or share with your office staff.

UPI AutoPay Guide — Quick Answers

Where is UPI AutoPay in the EduGradUP admin app?

Open the menu → Fee Setup, tap the Fee AutoPay tile, then the settings (⚙) icon for AutoPay Settings.

Where does a parent turn on UPI AutoPay?

In the EduGradUP app under Fees: tap Set up on the AutoPay card, or tap Pay Total and choose “Pay now + turn on AutoPay”.

What does the parent have to type?

Only their UPI id and a tick on the consent. The limit, debit date and validity come from the school's AutoPay rules.

How long does the parent have to approve?

48 hours. After that the request expires and the parent can set AutoPay up again from the Fees tab.

Can the school change the mode later?

Yes, any time. Moving a student to normal payment puts their AutoPay on hold; moving them back resumes it without a new approval.

Chat with us
🚀 Free Trial 💬 WhatsApp